Going Big

I have always loved public art. It calls to that blend between art and design that I’m drawn to. Creative, expressive and fun, but with constraints and considerations and an audience. The perfect blend of art and design with the chance to use big tools and get off the computer.
So I was in the dark little bathroom of one of my favourite places here on the Coast - The Hangar Climbing Lounge — and was thinking about something I read in a Jessica Hische interview one time. I’m going to butcher the paraphrasing but it was about no one ever paying you to do something you’ve never done before. A lightbulb went off. While I could probably paint a mural in my kids room for practice, it wouldn’t be quite the same. The stakes needed to be higher. I wanted to do something public for my first mural. The idea to pitch the Hangar to do a mural was born.
I knew I didn’t want to do it alone either. So I immediately thought of Trina at Blue Yonder Creative. I had met her once and she was super nice, she also has a cool illustration style that I thought would work well with mine and she was also a member of the Hangar. Bonus!
We reached out (nervously) to pitch the mural and they agreed! With any first time there was a lot of learning along the way. I want to share some process, some learning and growth along the way.
Step 1 - The pitch

Fist step was convincing the Hangar let us paint their bathroom. And to pay for all our supplies too. Trina knew the owners and we were both members, so we had a bit of an in, but it’s still hard to approach someone and try to convince them to trust you with changing the space of their business they love. We treated it like it was a real client project and sent them a full proposal deck outlining process and a moodboard to help them visualize our work and what this could look like.
We did a tonne of research all along the way in this process and need to give a shoutout the the amazing Pandr Design for sharing so many resources and being an inspiration.
Step 2 - The design
We had a basic idea in the pitch that we were going to base the design around - the Rainy River Boulders - an iconic bouldering area on the Sunshine Coast. This design process was something pretty new to me. Generally I’m a lone wolf so it was a fun and new experience. We measured out the space, and I created a template (necessary in a space like a bathroom where one must account for toilets and sinks and doors etc.). Then we basically played ping pong with the file, each adding new design elements and giving feedback on each others work. After a few rounds we ended up with a flat design we were ready to show the Hangar.

Final design draft
Step 3 - The planning
Once we got the go ahead to do our design it was go time! This is where the research really came in and we leaned heavily on tips and tricks from seasoned pros like Pandr. There were so many things we needed to learn.
How do we get our image on the wall?
To get the base of the image up on the wall we settled with a mixture of projector and freehand. Because of the tight nature of the space we could really only project onto the back wall through the door. So this is where we started and outlined the mural in pencil on that back wall. From there we projected smaller parts of the wall where we could make it work and filled in the rest freehand by constantly looking at our phones and laptops as we drew to try to remain as faithful to the original as possible. We found that luckily our design was actually pretty forgiving with a mixture of straight graphic lines and organic shapes so we were able to get the on-wall drawing quite faithful to the digital one.
How do we buy and cost paint?
Next we needed to get the supplies. Paint, brushes, tape, etc. Paint being the most crucial of all. Our towns paint store sold Benjamin Moore paint - so we knew that was what we would use. Trina took all of the colours in our design (in the design phase we had decided on a limited palette) and matched them with paints online. We then went into the shop to see the chips in person - some final colours ended up being what we expected, others we changed on the fly as we saw the real colours. We learned what sizes of paint cans were available and armed with the colour codes we created a grid on our digital sketch to help figure out approximately how much paint coverage we would need per colour with an estimate of 2 coats per colour. This gave us an idea of how much paint from each colour we would need to buy and a materials cost estimate to run by the Hangar.

Step 4 - The painting
Because this was a “free” mural we had the luxury of taking our time, and also had to fit it in around other client projects. So we ended up painting it over six 2-3 hour shifts. We taped all the things we didn’t want paint on (and learned that frog tape works the best), as well as straight lines in the drawing (like the trees). We mapped out what order we wanted to apply the colours in and tackled the colours one by one.
Some key learnings:
Buy middle of the road paint. Higher quality paint actually didn’t work as well as it couldn’t stand up to brush coverage and needed a roller to work, so we had to pivot on the colour/quality of one colour int he mural).
Don’t cheap out on tape. Get the better stuff.
Maybe don’t design a more detailed area around a toilet unless you want to spend a lot of time hugging a toilet.
A clear sealant layer (or 2 layers) will help make your mural last longer and easer to clean.
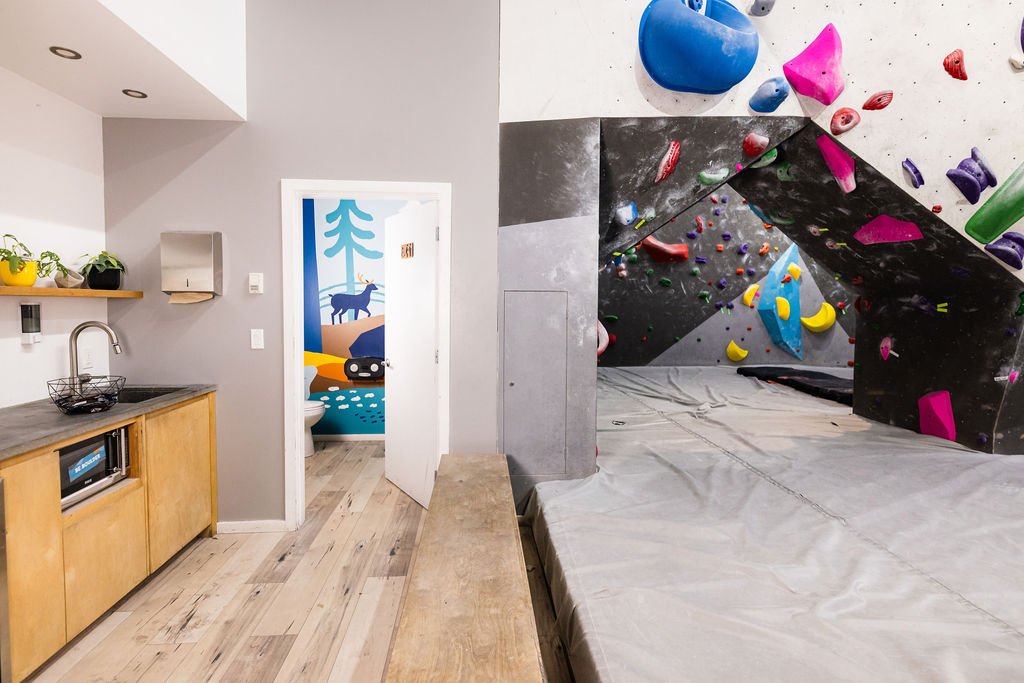

Step 5 - The post production
Upon completion, the next steps were to reveal the mural to the client. Luckily we finished up right in time for their Christmas party so that made for a nice “launch”. We were lucky enough to have the lovely Coast Photo document our final product and make it look beautiful, enabling us to share the project on social media. Part of the process was also documenting our learnings and figuring out how to move forward.
And now we are itching to do our next mural.
Reach out if you think a mural might be good for your business.